Skip to content
Colorado State University

Information Technology

IT Services

  • All IT Services
  • Purchasing & Surplus
  • Software
  • Computer & Device Support
  • Computer Replacement Program
  • Security
  • Documentation

Web Services

  • All Web Services
  • Design Process
  • Site Managers
  • Site Manager Introduction
  • Web Governance
  • Documentation
  • Forms

Remote Resources

Resources for remote teaching and working.

Remote Resources

Documentation

Search our self-help guides.

Self-Help Guides

Support

Reach out to us to get support.

Request Support

A College of Liberal Arts Division

Setup a Remote Connection to your CLA-issued computer

Home » Remote Access Setup Guide » Setup a Remote Connection to your CLA-issued computer
Estimated Reading Time
5-10 minutes
Last UpdatedApril 07, 2020
Prerequisites

In order to gain remote access to your desktop or connect to secure.colostate.edu, your device must be registered with DUO.

Navigate to https://www.acns.colostate.edu/duo/ and follow the steps provided to register your device.

Table of Contents
  1. Summary
  2. On the Computer You Will Be Remoting Into
    1. 1. Open File Explorer
    2. 2. Select This PC
    3. 3. Edit the Properties
    4. 4. Locate the Computer Name
  3. On the Computer You Are Remoting in From
    1. 1. Select the Start Button
    2. 2. Open Remote Desktop Connection
    3. 3. Create a Connection
    4. 4. Save the Connection
    5. 5. Reconnecting in the Future

Summary

This guide will help you set up a remote connection to your CLA-issued computer that you can use from a personal computer to log in to your work computer and have access to all files and programs just as if you were sitting in your office on campus. If you have already gone through this guide once and just need to connect please go to the Connecting to your Work Computer section at the end of the document.  

On the Computer You Will Be Remoting Into

taskbar

1. Open File Explorer

Select the File Explorer from task bar in the bottom left hand corner of your screen.

THISPC

2. Select This PC

a. Select the Computer tab at the top of the window.

b. On the left hand menu, select the This PC from the list.
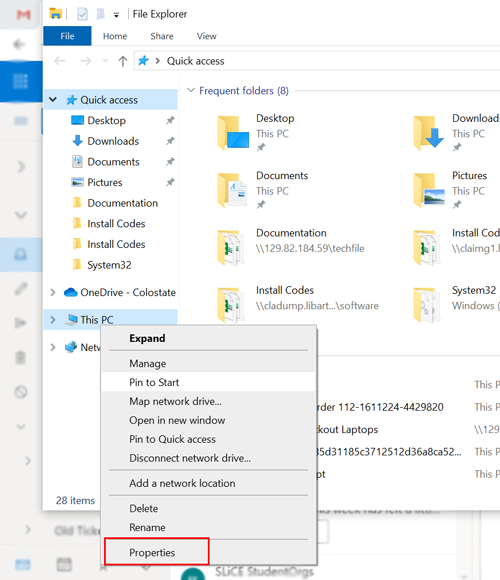
propertiesMenu

3. Edit the Properties

Right-click over the This PC and select Properties.
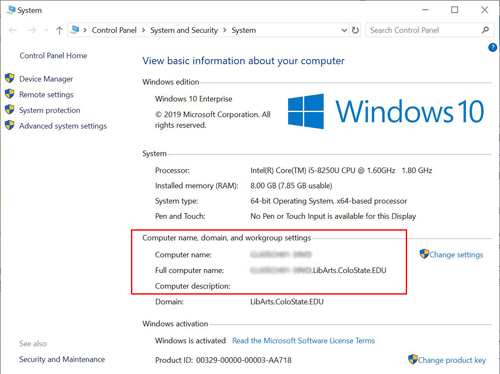
Screenshot PC computerName

4. Locate the Computer Name

Locate and take note of the computer name. You will need this information later.

NOTE: In order to remote in to this computer, it will need to remain powered on. You will not be able to remote in if the computer has been shut down.

On the Computer You Are Remoting in From

CONNECTING TO YOUR WORK COMPUTER

If this is the first time you are running through this guide, follow the below steps. If you have already saved your connection all you need to do is double click on the icon on your desktop. 

taskbarPCstart

1. Select the Start Button

Select the Start button at the bottom left hand corner of the screen.

2. Open Remote Desktop Connection

Type Remote Desktop Connection in the search bar and press Enter
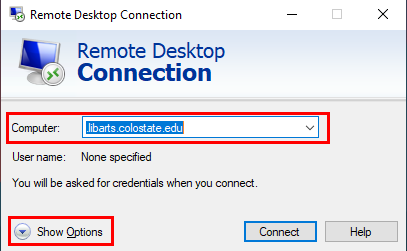
Remote Connection screenshot

3. Create a Connection

Once the Remote Desktop Connection has opened:

a. Type the Computer Name (saved in Step 4 from the CLA-issued computer)

b. Select Show Options at the bottom left hand corner of the window.
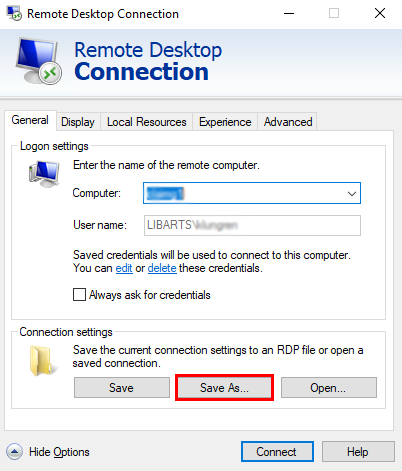
Remote Desktop Screenshot- Save as

4. Save the Connection

In the Connection Settings section, select Save As... This will create a shortcut, which we recommend saving to your Desktop.

5. Reconnecting in the Future

To establish the Remote Connection in the future, simply double click on the Shortcut created in the last step.

Related Articles
  • Install and Connect to PulseSecure (Mac)
  • Install and Connect to PulseSecure (PC)
  • Map a Network Drive (Mac)
  • Map a Network Drive (PC)
  • Microsoft Teams - Log Into Meeting as Student
  • Remote Access Setup Guide
  • Remote Network Drive Access via secure.colostate.edu
  • Setup a Remote Connection to your CLA-issued computer
Categories
  • Information Technology14
  • PC7
  • Remote Access11
Tags
  • Remote Access8
  • remote connection1
Share on facebookShare on linkedinPin on pinterestTweet on twitter

Post Navigation

Previous

Map a Network Drive (PC)

Next

Remote Network Drive Access via secure.colostate.edu

  • Liberal Arts
  • Student Accessibility
  • Faculty Accessibility
  • FSAS Help
  • FSAS Login
  • CLA Brand
  • CLAHub
  • CLA Help Desk
  • Admissions
  • Disclaimer
  • Equal Opportunity
  • Employment
  • Privacy Statement
  • Login
Colorado State University
© 2022 Colorado State University - College of Liberal Arts, Fort Collins, Colorado 80523 USA